Queen’s Tears

Queen’s Tears (Bilbergia nutans), also known as Friendship Plant)

Queens tears
Queens tears

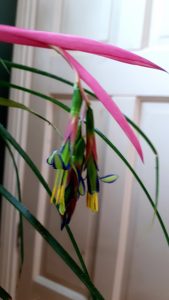
This is the most beautiful house plant.  Its flowers have nearly all the colours of the rainbow  – rose pink, yellow, blue, green.   It blooms around this time every year for me – despite being neglected, which is just what it seems to need – neglect.

Its pendulous pink, green and blue flowers with striking yellow stamens dangle at the end of long arching bracts.


I have had it for a few years now (parish fetes are great places to buy unusual plants) but I have only just discovered its name.  I have grown it in a pot, but I am going to try and grow a few shoots on a piece of bark

It is called  Queen’s Tears because drops of nectar are supposed to “weep” from the flowers when the plant is moved or touched – I haven’t managed to see that yet.

But it is also called Friendship Plant – because it readily sets new offset plantlets which can be given away to friends.  They say the best way to keep a plant is to give it away – if it dies on you,  your friend will have it to give it back to you.

Queens Tears is a bromeliad, (bro-me-lee-ad) originating from South America where they grow as epiphytes, that is they perch in trees in the jungle and absorb moisture and nutrition through their leaves – almost like an air plant as they have very short roots.


Asparagus Bed – preparation – with a little help from my friends with large machinery!

It only took a couple of hours to till a paddock in preparation for planting an asparagus bed.


Breaking the first sod – it didn’t take long, even with only a small 2 sod plough
Breaking the first sod - Ploughing with a 2 sod plough
Breaking the first sod – Ploughing with a 2 sod plough.  Probably the first time in a century!


Rotavating - a single run disc harrowed and rotovated all in one - tilled the sod and removed large stones
Rotavating – a single run disc harrowed and rotovated all in one – tilled the sod and removed large stones
All tilled and ready for planting - just need to let it dry out for a day or two.
All tilled and ready for planting – just need to let it dry out for a day or two.


Raised beds using upcycled fibreglass shower units

Current raised beds
Current raised beds


Current raised beds, the timbers of which are rotten

Planning the layout
Planning the layout

  Two shower units, each 24 inches (60 cm) wide by          6 ft  (1.8m) long, will make a 12 ft (3.6m) long raised        bed.


Digging out and levelling off

12 inches  (30 cm) of soil will be dug out so that only         18 inches (45 cm) of the units will remain above                   ground (the usual height for a large raised bed)


We inherited a number of fibreglass shower units left lying in a field and rather than break them up and throw them out (no one one wanted them for free off Done Deal!) I have decided to used them as raised beds.  Or maybe it is lowered beds in this case!

Because they are almost 30 inches (75 cm) deep, I am going  to insert them into the ground and use the 12 inches (30 cm) of top soil which I am digging out to fill the bottom half of the units.  This will mean that only 18 inches of the bed will be above ground although the actual beds will be 30 inches deep.  The top half will be filled with soil from the existing raised beds, the timbers of which are all rotten.

The units are 24 inches (60 cm) wide and 6 feet (1.5 m) long with one open end.  I am going to put two together so that there will be a drainage section in the middle where they meet. Also, I have drilled holes in the base and sides for extra drainage

I hope to have 5 raised beds – very hard work digging out all that soil and refilling the beds (I reckon it will take me 2 days for each) but I see it as a once off effort.  The fibreglass should last forever and I will never have to dig again!

Potting up spring baskets with primroses


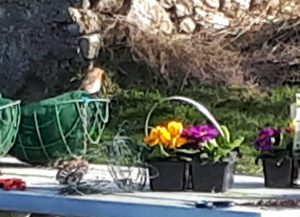
    The ubiquitous robin


Using a wheelbarrow to mix your compost makes it easy to fill your baskets


The finished product.  Dead head the flowers to keep blooms coming until well into the summer


I took the opportunity of a lovely sunny spring morning to pot up some primroses in hanging baskets to brighten up the place.  Little pots of 4 are reasonably cheap in Aldi at the moment and just a couple of sprigs of variegated ivy robbed off trees in the woods (they will root themselves and you will always have them) is an economical way to add interest.

Of course the ubiquitous robin helped me!

January 2018 – Snowdrops

After a wet and miserable December, the gallant snowdrop has appeared to raise our spirits for 2018.  It is not called ‘galanthus‘ for nothing!  There are 100’s of varieties, with just a green spot making the difference between them.  But the common snowdrop – Galanthus Nivalis – is as good as any and a couple of bulbs planted in autumn will increase year on year (if the mice of squirrels don’t eat them!)

Galanthus Nivalis – the common snowdrop
Galanthus ‘Plicatus’


Galanthus ‘Lady Beatrix Stanley’


But my favourite is not a snowdrop at all.  Is is commonly called snowflake and is a lot taller than the biggest snowdrop.